A-Wing Gaiters Done
Leave a commentSeptember 1, 2014 by catomighty
Just finished up the gaiters for the A-Wing pilot’s costume, and am very pleased with how they turned out.
The ones in Return of the Jedi appear to be some sort of vinyl material, of a sort which has eluded latter-day costumers. Here’s a Polaroid of wardrobe tests taken during production of the movie. The one isn’t completed yet (particularly the leg harness), but this is one of the clearest shots of the pilots’ gaiters.

All of the costume ones I have seen to date have been made out of regular fabric, generally a khaki bottom-weight twill. I had originally picked up some of this twill, but eventually decided against the colour of the twill, and went back to the fabric store in search of other alternatives. Found a sandy lightweight denim that was a much better colour match. And then went poking in the notions aisle to find some iron-on interfacing to stiffen it up in hopes of better matching the vinyl-ly crumpled folds of the original.
And there, made a great discovery — an iron-on Matte Vinyl Fuse by Pellon! This looked like it would make a much better match for whatever the original material was! Bought it, brought it home, and fired up the science laboratory. Initial test looked promising; ironed some on a small swatch, sewed it into a little tube. Seemed to hold up fine and look great. The real test would be to make the whole gaiters and hope it would continue to work so well.
Washed and ironed the fabric. Cut out the vinyl pieces to the sizes needed. Ironed these onto the fabric. Then cut the fabric pieces out simply using the edges of the vinyl as cutting guides. All nicely fit and no particular fraying at the edges since all is secured by the Vinyl Fuse.


Each gaiter is a simple tube. The pieces, including hem and seam allowance, were cut 18″ x 15″. Final assembled size is 17″ diameter, 12-1/2″ tall. The pieces for the strap were cut longer than needed since I wasn’t sure if I was going to use a slider on the strap or not. In the end decided not to use sliders since there is no evidence onscreen for them. To be screen-accurate, these straps are merely decorative, they are not actually functional in anyway to help hold the gaiters on! The straps were cut 4″ x 20″, and final assembly 2-3/4″ diameter tube, ironed flat into a 1-3/8″ strap, 16-1/2 diameter.
Assembling the main body of each gaiter was pretty straight forward. Sewed a fake seam down either side of the actual seam line and 3/8″ beyond it. Hemmed the top and bottom of each piece. Rolled the piece inside out and sewed the actual seam. Then flipped the outside back out, and ironed the seamline flat. Carefully keeping the vinyl fuse covered with its backing paper while ironing.
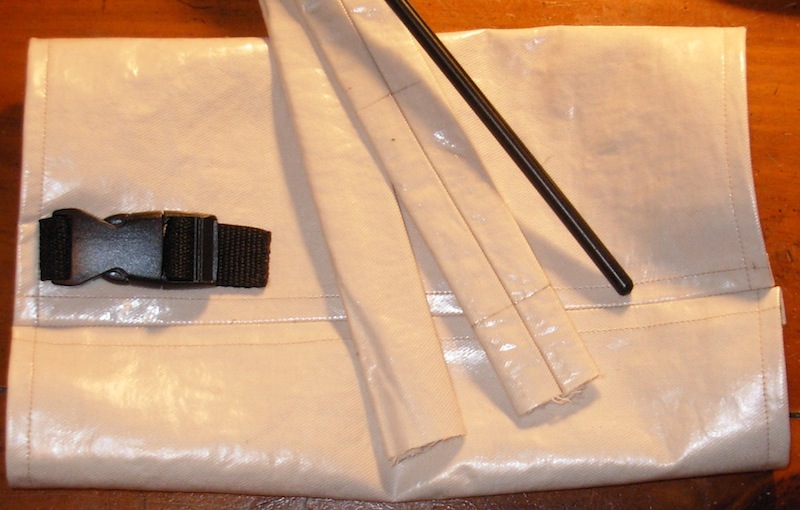
The straps were even simpler, but much more labour intensive. Sewed the seam of the tube inside out. Then cut a long strip of the backing paper to slide inside the tube while ironing the seam flat. Creasing the sides during this ironing was not a problem since this tube would be made into a flat strap. Then the laborious part was turning the long tube back outside right! This was just a lot of grunt work using long blunt objects to shove inside the tube while pulling the outside. Fortunately, I had a long piece of delrin rod which was quite handy for this operation (shown in the photo below). After the tubes were turned, then ironed them flat, keeping backing paper on the outside of the tube, but didn’t worry about the inside this time.
The movie gaiters also have decorative, and completely non-functional, parachute buckles attached near the top. Cut the 1″ black nylon strapping to size. Heated the ends gently over a candle (while wearing a respirator) to seal the ends of the nylon. Then hand-sewed them on.
Before sewing the final strap seam together, I marked those seamlines and a centerline on the back, and drew a 1″ square on the front center of each strap. After sewing the seam, ironed the seam ends flat. And then used a bit of hotglue to tack down those seam ends, and also the seam ends on the inner edges of the gaiters too.

Finally, machine-sewed around the 1″ square on the front of each strap. Then slid the strap over the gaiter and over the bottom nylon strap of the parachute buckle, lined up the centerline on the back of the strap with the seam of the gaiter, and hand-sewed the strap onto the gaiter, following the lines of the machine-stitched square.
As mentioned earlier, the gaiters are 17″ diameter, and the strap is 16-1/2″ diameter. This matches the look of the wardrobe polaroid, and screen images of this style gaiter worn by various characters, that the strap is slightly tight and causing creases in the vinyl material of the gaiter.
An added benefit of using the Vinyl Fuse, is that the finished gaiters stand up completely on their own. Unlike costumes made using just cloth for the gaiters, there is no need to jury rig a way to attach the gaiter to the pantleg or boot to keep it from falling down. The gaiter just slides over the boot and stays put.

As can be seen in the photo above, the cloth pulltabs inside the boot can still be reached. With a bit of wriggling, the boot can be pulled on over the pantleg with the gaiter already in place.


