Corsec Stands, Topo Shapeways, Customs
2November 25, 2013 by catomighty
I’ve been putting off posting about mounting ships from Shapeways and other custom modes for use with CorSec’s omni flight stands until I had all my Shapeways ships painted. But since I’m currently on a binge of trimming and priming chibi figures, I thought I’d get get this post up now. I’ll add more pix of finished paint jobs in a later post when I get back to them.
Topo’s Workshop on Shapeways offers a handful of very nice 1/270 ships suitable for use with X-Wing. My first order of Topo’s was also my first Shapeways order, and I decided to order the premium printing quality, Frosted Ultra Detail. This batch included 1 Senate Starship, 2 DX-9 Stormtrooper Transports, and 1 Class-A Cargo Container. Later on, I ordered 4 more Containers in the Polished Strong & Flexible material.
The Frosted Ultra Detail does have much crisper detail. It does also have some minimal ‘printing grain’ along all the back facing surfaces; this scraped off easily with an X-Acto. The polished material had less crisp detail, but no printing grain. I think the polished material is quite suitable for most gaming models, and the frosted ultra detail is great for when you want a stand-out piece. I washed and primed all the models, and have finished the painting on the containers.
Here’s a comparison shot, the white container is the frosted ultra detail one. It also has a slightly different roof-hatch design. Topo’s first designs from my original order had some fine detail which only came out in the high detail printing, but was lost at lower resolutions. He later changed the detailing to accommodate the lower print resolutions. Fortunately, I ordered that first batch in high detail.
Here’s all 5 containers. I also used magic markers to colour code the container counters that come with the Millenium Falcon. Each counter can be used as a ship card to track damage and any other status markers for each container.
These are all mounted on CorSec’s Shuttle Bases. The metal rods for CorSec’s stands are threaded for 6-32. For the containers, I fit a #6-32 T-Nut onto the mounting post built into the model. I took a drill bit and spun it by hand to widen out the hole in the mounting post to make it wide enough to insert the T-nut. And for a secure fit on the CorSec rod, I removed the rubber grommet from the top of the rod so that the threaded end would have more length to screw tightly into the T-Nut since the threading inside those nuts does not start right at the edge. I also put T-nuts into the DX-9’s — once they’re wiggled inside the DX-9, then they can be moved into position with tweezers. On the Senate Shuttle the mounting post is right near an interior wall, I just used a plain #6-32 hex nut glued on top of the post, and counter-sunk slightly into the wall for security. All the nuts are epoxied in place.
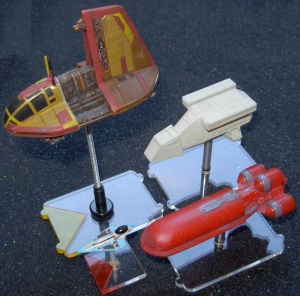
Here are more ships in flight. A DX-9 and Senate Shuttle (not finished painting them); plus 2 repaints of ships that are perfect scale models for the game — a Delta-7 Aethersprite by Wizards of the Coast, and a Sheathipede class Neimodian Shuttle which is a die-cast model by Di Agostini.
The Aethersprite is slightly re-painted, and was easy to mount. I cut it off its original base, but left the soft plastic pole attached to the ship. Then just screwed this into the base, and the soft plastic self-threaded in the brass nut. It’s mounted on a 25mm square Omni Stand. This does not have the nubs on it for the movement templates. But since the ship is supposed to be quite agile, I treat movement similar to a barrel roll. The movement template can be placed anywhere along the front edge, as long as the template does not over-extend the side of the base. Then after moving the ship, it can be placed similarly anywhere along the far end of the template.
The Sheathipede took a bit more work to mount. The figure comes with a threaded post, but the threading is metric and also much smaller than #6-32. The quickest solution I came up with was to use a 3″ length of #4-40 threaded rod. It doesn’t quite match the threading in the shuttle, but I was able to jam it in and force twist it into place. It is also too skinny to quite fit into the nut in the base, so I used the plastic sleeve of the ship’s original mounting and epoxy to permanently attach it.
I also did some minor modifications to the ship. Added a weapon mount to the top fin; shortened the antennae to accommodate the weapon; and also cut, the landing gear and reglued them into a retracted position for flight. And gave it a bit of a repaint.
And rather than make movement dials for this and the Senate Shuttle, I took some [of the many] excess mission tracking counters and re-painted one side to show movement selections. Just place the chosen movement counter face-down.
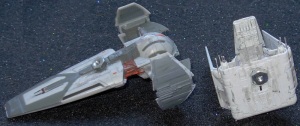
And finally, a pair of custom ships: a Star Courier (the Revell Easy-Pocket Model of the Scimitar), and the F-Toys Lambda Shuttle (a bit smaller scale, I bought this before FFG announced their release; but it’s also a better model, the wings fold nicely). For each of these, I carved a recess to hold a #6-32 hex nut and epoxied it in place. The Star Courier is pitched at an angle to keep the model mostly within the bounds of the base.
Overall, I am quite happy with the quality of both Topo’s Shapeways models, and CorSec’s stands. The stands with the metal rods are much more durable than FFG’s. Rather than making ship tokens to put on the stands for these particular ships, I just scored the bases and painted in the front firing arc using transparent Model Masters paint, and inked inside the score lines with Micron Art pens.


I have the corsec telescoping rods and small star fighter base template for X-wing. The base pole at the bottom is too wide though for the necessary plastic donut meant to hold the pilot card on the base. Do you have a suggestion? I know the omni-stand system works with the simple straight pegs. they’re smaller and the donut fits them fine. But I’d really like to use the telescoping rods which are wider at the bottom. Any help would be GREATLY appreciated!
I haven’t been using the donuts with them. Instead of using the ship’s card I’ve been scribing and painting the firing arc directly on the plastic. So, I hadn’t even noticed that problem before.
Just pulled out all the stuff and examined it. The basic solution is to widen the inner hole of the donut. My first thought would be to take a drill bit that matches the diameter of the rod — just hold the drill bit by hand and spin it between your fingers to drill out the hole wider. There’s a chance the acrylic might chip a bit during this, but I don’t think there’s likely to be any critical destruction if you work slowly and back up and start again if the bit binds at all. If there are any chips that might cause more looseness than you’ld like, then a bit of putty will smooth them over and give you a snug fit.
You could also contact Jonathan Bowen and ask if he’d be willing to make donuts with the proper inner diameter for the telescoping rods. He tends to be very responsive to customer input. He might well add this as a regular item to the product line.
Please post results back here of whatever solution you do end up with. That would be useful info for others too.
Cheers,
Cat